

The Ultimate Guide to Exposure Bracketing
Exposure bracketing is a great way to increase the dynamic range of your camera, whether it is a brand new, top of the range one or a 10 year old camera, and the great thing is that most digital cameras have a bracketing option. I’ll also show you how you can take bracketed sequences even if your camera doesn’t have that function.
Exposure bracketing is where you take a sequence of photographs with different exposure levels, and then blend them together to create a photograph with a much higher dynamic range. It gives you all the details you will ever need in your photographs so you can create the exact image you had in mind.
Why you need Exposure Bracketing
If your photos come out like this…

Over exposed photograph
Or like this…

Under exposed photograph
Then you need to learn exposure bracketing to get the most out of your camera.
When the sky is really bright and the land is really dark, it is easy to end up with a poorly exposed photo. This sometimes means that the dynamic range of your camera isn’t as big as the dynamic range of the scene in front of you.
What is dynamic range?
Dynamic range describes the ratio between the brightest and darkest parts of an image, from pure black to brightest white. The best digital cameras capture only half as much range as the human eye.
Now you might be thinking that shots with a high dynamic range aren’t always the best and are not always needed, but if you have all of that detail to play with, you can then choose whether or not to use it when you edit your photos.
The worst thing in photography is when you have an idea to edit your photo in a certain way, but there isn’t enough detail in the photograph to be able to create your vision.
The Process of Exposure Bracketing
You do need to know how to get a good exposure in your photographs before learning this process. I have done a video on this showing you exactly how to get a good exposure, click here to see that video. If you do know how to get a good exposure but are still struggling with the conditions you have, this is when exposure bracketing comes in handy and is well worth learning.
Bracketing is basically a process where your camera takes three, five, seven or nine photos, all with slightly different exposures.
It’s also known as HDR, or exposure blending, but they all pretty much mean the same thing.

The darker shots will have details in the brightest parts and the brighter exposures will have details in the shadows.
The darker shots will have details in the brightest parts and the brighter exposures will have details in the shadows.
Then when you are editing, most programs can then blend them together to give you more detail and less noise in the shadows and highlights.
It works really well with landscape photography, real estate and architecture photography; basically anything where the camera is going to stay still and there is a big difference between the highlights and the shadows. With very little movement in the frame.
I even shoot them handheld sometimes, and you can too if your hands are steady enough but the best way to get a successful blend is to shoot from a tripod.
You might be thinking you could just use a graduated filter and bring down the brightness of the sky with that. And that is true, but if the horizon isn’t straight or you are shooting real estate, these won’t give you the best results, and this is why bracketing is so good. No matter how complex that horizon line is, it will give you detail in all of those bits of your frame.
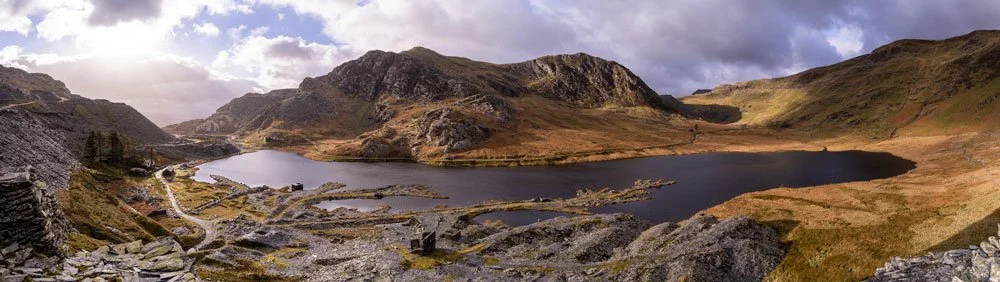
This was shot as a bracketed panorama
In this shot, I could have never done this with a grad filter as the boarder between the sky and the land is full of peaks and troughs.
Most cameras have an exposure bracketing function built into them. In my Sony, it is in the drive mode option, this is left on the D pad and down 4 or 5 in any of the photography modes.

Sony Exposure Bracketing function
If it is greyed out, you might have a setting like picture profiles turned on. When this is off, it becomes available.

In the Canon DSLR cameras, find exposure comp/aeb in the menus and set the different exposures there. If you shoot with a mirrorless Canon camera, it has a dedicated tab, like in the image below.


In Nikon cameras, look for auto. bracketing set, and select AE bracketing.

Fuji cameras exposure bracketing
In Fuji cameras, it is in the drive setting.
In the Sony camera, all you need to do is look for this function, BRK C or BRK S.

BRK-C or BRK-S in the Sony camera
S is for single shots where you have to press the shutter button for each shot in the sequence, and C is for continuous, where you can either hold your finger down to rapidly fire through each one … or if you turn on the self timer in bracket settings, this will do them all automatically with one press.
This is how I have it set up in all of my cameras so whenever I switch bracketing on it is all ready to go with the self timer on in that setting.
Note: When you do shoot with a Sony camera in continuous mode, it will drop the bit depth from 13 bits to 12 bits. However, this loss is more than made up for when you blend the image together.
In most cameras, you can also change the order your photos come in. I like to shoot them darkest first and brightest last. This means they are easier to spot on your timeline.

in order they are easier to spot in your timeline
In most cameras, you can also change how big you want the difference to be between photographs, and how many photos you want in the sequence.
If you shoot with Canon, Nikon, Fuji or any other brand, just do a search on exposure bracketing with your specific camera model to find out exactly how to do it.

the first number is the exposure value change and the second is the number of photos in the sequence
In the Sony cameras,, the first number is the exposure value difference. and the second number is how many photos.
I either shoot 1.0ev3 or 1.0ev5. So 3 or 5 shots with a 1 stop difference between each.
When you are in aperture priority mode, it will change the shutter speed.
When you are in shutter priority, it will change the aperture.
When you are in manual mode with manual iso, it will change shutter speed.
When you are in manual mode with auto iso, it will change iso.
I find that it is best to keep it in manual mode with manual iso … or aperture priority so the camera always changes the shutter speed.
If you’re in shutter priority and change the aperture through the sequence, the depth of field will change, which is the amount of your photo in focus from front to back. You want this to be consistent between the photos you take.
With auto iso, the iso will change, this just changes the gain of the photo, so there is no difference in the light coming in to your camera between shots. This would be like duplicating the same shot and then changing the exposure slider in lightroom … and so you wouldn’t get the benefits from bracketing by changing iso.
If you are new to this, just keep it in aperture priority or manual mode with manual iso.
Also, make sure your white balance is set to one of the presets. This will mean it won’t change between shots. I keep it set to daylight and I make sure I am shooting in raw so lots more to work with when editing.
Again, you want consistency through the sequence.
Two other ways to shoot Exposure Bracketed sequences
Using Exposure Compensation
In aperture priority, when you have a good exposure, use the exposure compensation dial, and turn it to -1, take a shot, turn it to 0, take a shot, and then set it to +1 and take the third shot. This will give you a 3 shot bracketed sequence with 1 stop differences between each photo.
2. Manual Mode
In manual mode, set up so your exposure looks good on the back of the camera, using your histogram or zebras, depending on what you use to get a good exposure, then double the shutter speed and take a shot, change it back to the same shutter speed you started off with and take the second shot, and then half the shutter speed and take the third shot.
These three different ways will give you the same result, the bracketing mode is just an automated and easier way to get it done quickly.
Bonus Reason for using Exposure Bracketing
Now there might be times when you are not sure how to get a good exposure for the scene in front of you, and if this is the case, this setting is sometimes a lifesaver.
Let’s say you have a scene in front of you and you just can’t get a good looking shot on the back of your camera no matter how hard you try. If this is the case, try this:
Put the camera into aperture priority
Turn bracketing on and turn it to BRK C with 1.0ev5
Frame up your shot, focus and then take the sequence
It will take 5 of the same shot with a 1 stop difference between each of them.
Then when you are editing, just go through the photos and work out which is the best one and choose that one. Also, on the off chance that the scene actually has a really big dynamic range, you will have the option to bracket them as well, as long as you have kept the camera still enough.
This does take up a bit more space on your hard drive, and it can make you a lazy photographer, but it is a great way to give yourself options when editing.
How To Know if you need bracketing
Now some scenes really do need bracketing to work, and others don’t.
The way I work this out is to look at the histogram … if you’re not sure about how to read the histogram, click here to watch a video on histograms and zebras.

Histogram touching the sides
If the histogram looks like a halfpipe, with peaks at each side, then I’ll bracket.

histogram within the boundaries of the graph
If the histogram looks more like a hill or a mountain, and it is contained within the sides of the graph, then you don’t need an exposure bracketed sequence.
If you are unsure, bracket to be on the safe side. It is better to have too much data rather than not enough.
When editing, I use lightroom, but you might have to search out for the editing program you use.

select the images in the sequence
In lightroom, find the images along the film strip, select all of the images in the bracket by clicking on the first one and then shift and click on the last one.

Photo merge and HDR to blend your selected photos
Right click on them and then click Photo merge, HDR.

These are the options you have in the popup box for exposure blending
In the popup box, you’ll have a few options.
I’ll check auto align.
I’ll have auto settings unchecked.
With de-ghost amount, this is all down to personal preference, but this just gets rid of any ghosting you might have when something moves from one photo to the next in the sequence.
And by ghosting I mean that it looks like the thing that has moved is see-through like those fake ghost photos.
If you select de-ghosting, just turn on Show Deghost overlay so you can see what it is changing.
4. Then click merge.
Once processed, the new blended image will have a bigger dynamic range than if you would have taken just one shot.
When you are editing these blended shots, it is easy to take it a bit too far and make it look unnatural, so just be careful with those sliders. Remember, subtlety is the key to editing.
Now you know exactly how to get a good exposure, even when the conditions are harsh, but how do you work out what to put in your photographs and more importantly, what to cut out?
Well this is all to do with knowing where you stand and what focal length to use … there’s a bit more to it than that, and in this video below I show you exactly what you need to know to get a really compelling photograph to take you from snapshots to awe inspiring photographs.
Thanks for reading,
Mike