
The Best Way to Sharpen Your Photographs in Lightroom
When you start to edit your photographs, you might want to add a bit of sharpening to them to make your photos pop, especially when you change the file type in your camera to RAW … which you should be shooting in for all of the extra data you get in RAW files …
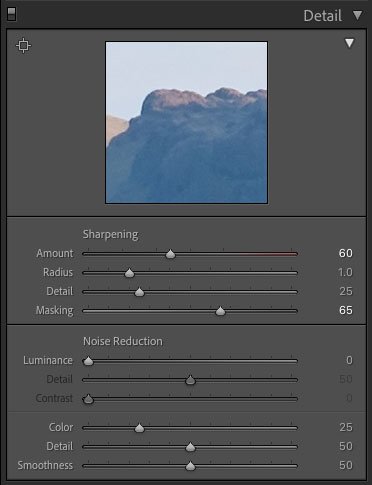
The best way to sharpen your photographs in lightroom is to use the detail panel in the develop module. move the top slider to about 60 and then the masking slider about half way along. If you hold the option or alt button down it will show you when it is just the edges being sharpened.
I either add global sharpening or sometimes just a bit of local sharpening, depending on where I want to draw the viewer’s eye to.

Adobe Lightroom is a great place to start edting your photographs
What is Sharpening?
Sharpening is basically how clear your photograph is when being viewed.
You’d think it would just be a case of getting your photograph in focus and that is it … but there is a little more to it than that.
When you set your camera to save your photographs as jpegs, the camera will add some sharpening to your photographs, and through the creative styles/profiles, you can set the amount of sharpening on your photographs.
However, when you save your photographs as RAW files in camera, this is basically just the data from the sensor. When you bring your photos into lightroom or whichever editing program you use, you do have to add this sharpening before exporting your final edited photograph, otherwise it might seem a little soft.
Why Add Sharpening Afterwards?
Sharpness gives a photograph that was taken well, just a little bit extra pop that it might be lacking. Knowing how much to add is a very personal thing … some might not think I add enough and others might think I add too much, but it is something you develop over time, to your personal tastes.
You can by all means leave the sharpening alone, but your images will end up softer than they potentially could be, so it is worth adding a little, after all, editing is a way of bringing the best out of your photos.
How to add Sharpening in Lightroom
In lightroom, I’ll assume you know how to bring your photos in to the program … if not, click on this video here to learn how to do that. It is pretty straight forwards and doesn’t take too long.
Once your images are in lightroom, go to the develop module. This is the tabs on the top right hand side of the lightroom app.

Lightroom Develop Module - Where all of the editing happens!
Once you are in the develop module, you will see some dropdown panels on the right hand side, under the histogram.

The minimised panels for editing in the develop module of lightroom
Expand the detail menu and this will give you a few options.

Open the detail panel
You will see sharpening here …. and this is where you will add your sharpening to the whole image … and where you can control how much of the image is sharpened.
I normally move the amount slider to about 60.

Set amount to 60 in the detail panel
I leave the Radius and Detail slider alone
With the masking tool, I will hold down option/alt and then move the masking slider, this will give me a black and white image overlay on the photograph.

Hold down ALT or Option and slide the mask slider along - the white bits will be sharpened, the black bits will not
I just drag this along until only the edges are white … with this overlay mask set like I have it, only the white bits will be affected by the sharpening.
If you let it sharpen the whole image without this mask, it will sharpen everything … and I mean everything, including any grain or noise in your image as well as any banding that might occur in gradients of colour.

With the mask at 0, everything will be sharpened, so slide that mask slider to the right
If you are enjoying this article, you may also like this article I have written on getting a good exposure, click here to open this in another tab.
Local Sharpening
The Detail panel is a great way to sharpen your photographs and it will do a really good job for 95% of your images, but there is another way if you really want to do some slight bits of sharpening to parts of your photograph.

Use this to locally sharpen parts of your photo
With the new masking tool, which is the circle in the Panel below the histogram this gives you some options to really hone in on where exactly you sharpen your photograph.

Select the brush tool and paint on the photo what you want sharpened
The way I do this is to work out what part of the photograph I want to add sharpening to, I’ll then select the brush tool and paint on the part of the photograph that I want to sharpen.

The red area is where I have painted on to add local sharpening
Once I have painted this on, I’ll add some sharpening in the mask dropdown menu. With this, I will add up to about 10-30 again … any more than this and it might look a little too oversharpened, but this is all down to personal taste.

Add between 15 and 30 to the sharpen slider
How to Spot Oversharpening
If you want to know how much sharpening you have added, get the image to 100% by zooming in with the space bar or by clicking on the 100% tag in the navigator panel in the top right hand corner.

click on 100% in the navigator panel
Then play around with the detail slider … the amount and then the masking … if you slide the amount to 150 and keep the masking to 0, you will see everything being sharpened.

This shows what happens with too much sharpening and no mask … horrible …
Then if you slide the masking slider to the right, it will progressively take the sharpening away from the solid colours and focus it more on the edges. So it is a case of balancing these two sliders out.
Like I said, I normally add about 60 on the amount slider and then about 40-70 on the masking slider … using the option/alt button to show the black and white mask.
THis is what I normally do with my photos
If you start to see a white halo around your edges, this is a sign that you are oversharpening your photos … it is sometimes hard to see when you look at the image as a whole, but when you zoom in, you will see it, and this is why you have the 100% square in the detail panel.
So if you are thinking your photographs are looking a little soft, then try adding some sharpening with the detail panel and see if you can get more out of your photographs.
If you’d like to watch a video on this where I go into detail with specific examples click on the video below … just be aware that it is in the older version of lightroom before they changed the masking panel … but between the video below and this article, it should all make a lot more sense … I also go into detail about the noise reduction options in the detail panel as well …
And if you enjoyed this article, try this one next on why you should never skip backing up your lightroom catalogues when closing down the program.
Thanks
Mike